A new beginning
February 24, 2011 § 1 Comment
After knitting for a couple of years and blogging about it, I have decided to take this hobby to the next level. I have got a domain of my own and plan to change my online identity. I was known as BloreKnitter on Ravelry (come to think of it, what a lame username) and want to change it to affiknity. A lot of thought has gone into selecting this name. After spending a couple of days coming up with names and shortlisting them, I chose this one which was also liked by my husband. So, here I am. Please update your RSS feeds, email subscriptions, bookmarks et al to my new home: http://affiknity.com/ I hope you all will continue to lend me your support and encouragement on my new site.
I will not be posting anything new on this blog and this will continue to be a place holder. If people find themelves on this blog, they should know where to head to from here.
Wheatspikes Vest
February 4, 2011 § 2 Comments
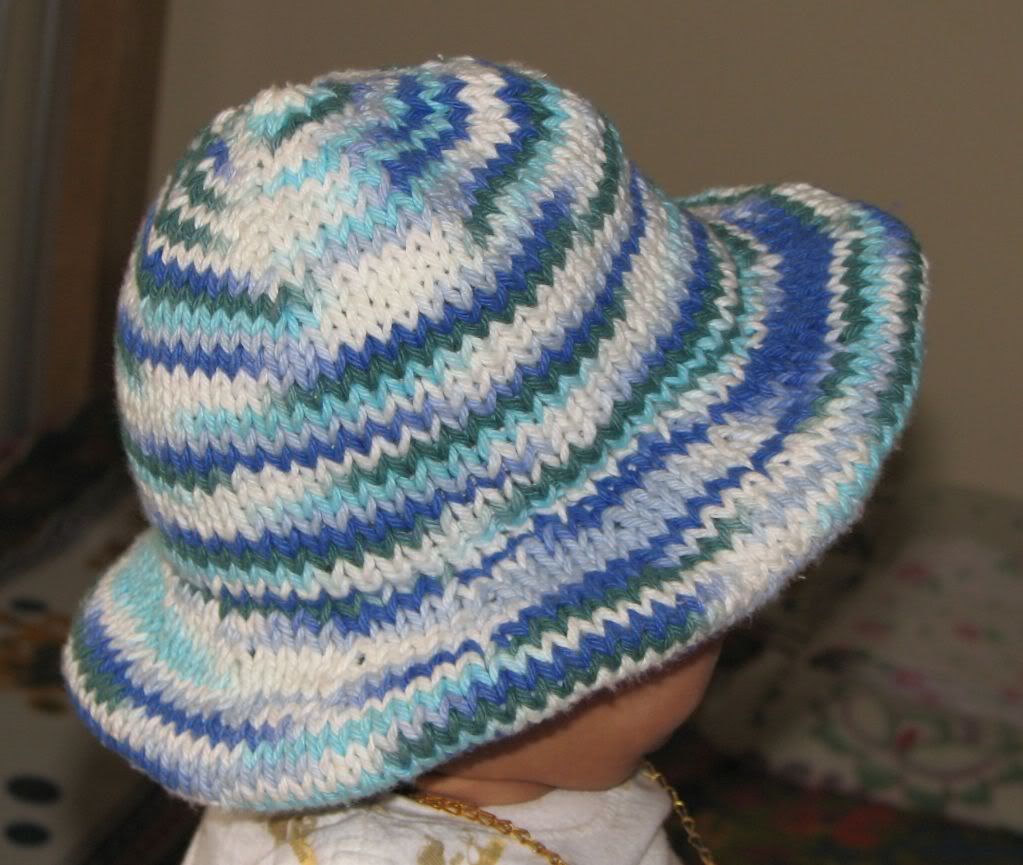
When I saw this vest offered for test knit, I decided to volunteer. Not that I have a girl to knit for, but the vest was too cute. I don’t have many girly colors in my stash and I had been wanting to use Phildar Copacabana which Preeti had sent me sometime back. This seemed like the perfect opportunity to use this yarn and so I did.
The vest is knit bottom up in pieces, but can be easily adapted to knit in round, which is what another test knitter did. The pattern is well written and I, for once, did not find any errors in the pattern. Unambiguous and easy to follow instructions and the pattern comes in sizes from 0-3 months to 24 months. It knits up quickly and is perfect for that last minute gift or to use up a lone skein or two. I used around 1.5 skeins and still have half of it left. Wondering if I can make a couple of coasters with it – I just love the fresh, bright colors of this yarn.
I didn’t make buttonholes on the sides thinking the neck ribbing will be stretchy and can stretch over a kid’s head, but when I tried this on my son, there is hardly any elasticity in the ribbed neckband. It could be the yarn’s characteristic or it could be because I knit on a tight gauge. I did go down a couple of needle sizes than the recommended one to get the required gauge, so it could be that! I need to rip the shoulder seam apart and make some buttonholes now.
This goes into my gift stash waiting for a lovely girl to come and claim it.

Pattern: Wheatspikes Baby Vest by Sole Pitencil
Yarn: 1.5 skeins of Phildar Copacabana
Needles: US 5 3.75mm straights
Ravelry Project Page
Uravu: Magic with Bamboo
February 2, 2011 § 5 Comments
We visited Wayanad recently and one of the places we visited during our trip is Uravu. It is a non-governmental, non-profit organization which strives to provide employment to the underprivileged people by making handicrafts from bamboo. It is tucked away in a small town Thrikkaipetta in Wayanad District. I had read about this on someone else’s blog and had it on my must-see list when I visited Wayanad last week.
Uravu is around half an hour drive away from Enteveedu, the home-stay where we stayed. We reached this place at around 9 and we could see people already busy working. We first visited the stores where they sell handicraft items. The store was a sight to see. Bamboo everywhere, in all possible colors and variety and shapes. I was mesmerized with the amount of innovation and creativity around me.

Bamboo vases in all possible sizes
The first sight I caught was this corner where bamboo vases in all possible sizes were neatly arranged. There were many more stocked away, which I couldn’t see. Apparently, bamboo vases sell like hot cake.

Bamboo lamp shades
Then there is this corner which had beautiful lamp shades. I am not sure how much heat bamboo can withstand, but lamp shades look so pretty. Don’t you agree?

Bamboo lamp shades
Look at the far right one. The design is so intricate! Makes me want to buy all those.

What a beauty!
Why stop at lamp shades? Look at this hanging piece which looks so elegant.

Candle stands, pen stands
Candle stands, pen stands, files, pens – lots of useful and beautiful things.

Jewelery

Bangles
How about some jewelery? Who would have thought bamboo can be worn around your neck? And such pretty necklaces too!

These women are making thin strips of bamboo which will be used to make curtains and mats. They cut strips first and then file them to get a smooth finish.

A worker making door curtains and floor mats using the loom. He was working on it methodically – there was a rhythm to his work which was so mesmerizing to watch.

Another worker making a lamp shade.

A few women polishing (applying varnish) to finished items.

They do screen printing on order. You select the design and they make any item you want. Look at these freshly printed key chains.

I was so impressed with this little factory that I had half the mind to buy all the items there. I controlled my urge and picked a few things – a serving tray, a few pens, a fruit basket and a very interesting musical instrument which makes the sound of raindrops. You have to hear it to believe it.
Some may label these items as expensive, but as someone who hand knits sweaters, I know how much time and effort goes into making something hand-made. A machine knit sweater will always cost less than a hand-knit one, but where is the love and the human touch in it, I say? I did spend a big amount on buying these bamboo items which I might probably get for cheaper here in Bangalore, but this is my way of supporting this local seller.
Mrs. Redjeans
January 20, 2011 § 6 Comments
I am very lucky to have a supportive family. Be it my decision to work after having a kid, or taking up a new exercise regimen or my hobby – my family is very supportive. My mother-in-law especially loves the fact that I knit. She does a bit of crochet here and there, but she thinks my knitting skills are really good. She hasn’t seen any projects from other knitters who are far more better than me, so she is blissfully ignorant and I don’t want to correct her. When my biggest admirer requested for a sweater, I just had to do it.
I looked through a lot of patterns and finally decided on Mr GreenJeans by Amy Swenson (ravelry link). I liked the way cables add shaping to the cardigan. I thought this will be flattering on a typical Indian woman (read pear shaped). A very well written pattern, seamless (yay!!!) and is generous on the different sizes. For those with little girls, the same pattern is available for little girls too.

I have knit raglan cardigans before for babies, but was not sure how it will look for an older woman. When my mom tried this on, all my doubts vanished – it looked great on my mom. The neck is too deep for my taste, but looks good. I added buttons all the way down to make the cardigan more practical. The only problem I had with this cardigan is the button band. The bands are knit after picking up stitches along the edges of the body and are worked in 2 x 2 rib. Since this rib is stretchy, it pulled the body stitches along with it and the cardigan looks like it is crunching up its nose and making faces at me. The buttons try to keep the ribbing in place, but it doesn’t help the look.

Yarn is from Surya Emporium, Commercial Street. It’s a 4-ply Vardhaman acrylic yarn. I held double to get the gauge. The yarn is soft and squishy and has great stitch definition. I had bought this yarn to make a baby blanket and chose this color because it was neutral, yet cheerful. I have been using this yarn over and over again, but it still doesn’t get over. I have another 100 gms of yarn left! Buttons are from Pydal. I think the yellow ones add a bit of variety to the monotonous red color.
The sweater was a Diwali gift to my mother-in-law and she loved it. Mumbai has been especially cold this winter and she is making a good use of her gift.

Pattern: Mr. Greenjeans by Amy Swenson (Rav Link)
Yarn: 4-ply Acrylic in Red bought at Surya Emporium
Needles: US 5 3.5mm. Straights for the body and DPNs for sleeves
Buttons: 4 numbers from Pydal
Ravelry Project Page
In Threes
January 14, 2011 § Leave a comment
In Threes is a simple, yet elegant cardigan for a little girl. The male version of this is Wyatt, which I test knit for Kelly and it is equally cute. I had added In Threes to my wishlist and when Kelly saw that, she generously sent me the pattern as a gift.
I had always wanted to knit this for a girl, but didn’t have any recipient handy. After Kelly’s generous gesture, I had to find a recipient to knit for! The victim was my niece, but sizing was a problem. My niece is almost 8 years old and this cardigan runs upto 6T. After some swatching and gauge checking, I chose a yarn and a needle which would give me the size I want with the numbers from the pattern.
Ever since I had a boy, I have been buying yarn in boys colors and the only neutral yarn I had was this red one. It’s a 4-ply acrylic yarn from Surya Emporium. I held it double and with 4mm needles, I got a gauge of 17 sts to 4″. The pattern calls for 19 sts to 4″, which was fine by me because the cardigan will turn out bigger.

I initially planned to do the yoke in colorful stripes, but blame my choice of colors, the yoke turned out messy, so I decided to stick to one color. I did make some modifications – got rid of the garter ridges on the sides and added sleeves. I guesstimated the sleeve length hoping that I get it right. All the details are on my Ravelry project page. It’s a good thing that I kept notes as I went along because I wouldn’t have remembered anything now – the cardigan was knit last September! I am not too happy with the buttons, but that’s the best I had in my stash.
The cardigan was gifted to the girl during Diwali which she promptly modeled for me. Turns out the sleeves are quite short, they come upto just 3/4th of her arms – so my guestimates are not that good after all. Apart from that, the cardigan fits well – good length and a comfort fit. The girl was happy. I am guessing she would have been happier if I had added a crocheted flower to it to make it more girly.

Pattern: In Threes by Kelly Herdrich
Yarn: 4-ply Acrylic in Red bought at Surya Emporium
Needles: US 6 4mm. Straights for the body and DPNs for sleeves
Buttons: 5 numbers from my stash
Ravelry Project Page
I won!
January 11, 2011 § 8 Comments
I rarely win a giveaway contest. That does not discourage me from entering though, so I entered indigodragonfly’s anniversary contest and kept my fingers crossed. Five skeins of yarn of your choice and a cute hand bag – who wouldn’t want to win that! I left a comment and forgot all about it until I saw a mail from Kim telling me I had won.
All this happened way back in September 2010. Kim promptly mailed me saying she has mailed the package and it would be a long wait until it arrives here. I waited patiently and the pages in the calendar turned and it was November. Two whole months and the package was no where in sight. I called up the foreign post office and the customs office and they had no clue. I didn’t have a tracking number and it just made things more complicated.
Come January and I had lost all hopes of seeing that package in this lifetime. I would still dream of holding that yarn in my hands and giving it a friendly squish, but the real package was non-existent. I imagined the evil wife of the customs officer looking at my package and exclaiming ‘Yarn! And such lovely yarn. Surely, I can keep it for myself.’ I imagined her batting her eyelids and seducing her husband to give in to her evil plot. I cursed her and the officer every time I thought about the yarn and that’s the best I could do.
In short, I accepted the bitter truth that the yarn is never going to make it home and that’s when I got a letter from the customs office asking me to pay duty on a package from Canada. The letter was posted on Nov 9th and it arrived a good two months late! I hurried to the office the very next day (because I couldn’t go the same day, the office was closed by the time I read the letter) and paid the bribe duty and was rubbing my hands together to get hold of my package. The officer politely told me that they can’t handover the package unless it was an emergency. But, don’t you see, this was an emergency – I had waited for 4 months and when I could finally feel the heavenly softness of the yarn, you are telling me you can’t give it to me? The officer did not think so and he asked me to wait until the post office decided it was time for me to get the yarn.
Another 5 days of waiting (which was harder than those 4 months) and the package is finally, finally, finally here. I ripped the package open and what do I see?


A lovely handbag and 5 skeins of yarn. I chose the colorway, so I knew what I was getting, but I was not prepared for the breathtaking colors and the softness – oh my God, the yarn is so squishingly soft and warm! The photos don’t do justice to the rich colors of this yarn. I am somewhere between the ninth cloud and heaven. Should I end this post by saying ‘And they lived happily ever after’?
On a side note, any suggestions for a cardigan pattern which uses two skeins of lace yarn?
The second year
December 7, 2010 § 10 Comments
Ninad turned two recently. His second year was eventful and memorable, in a good way and in a bad way. His language skills developed really quickly and his vocabulary has been growing exponentially ever since. Here are some memorable moments in pictures.

He learnt to lift things and carry them around

And some more things...

Sat in a box...

Learnt to charge Mama's mobile...

Went bald and slept in weird positions

Explored Mama's kitchen

Traveled by train and played with aunt's mixer

And with her washing machine

Had fun with his cousin

Bonded big time with his big brother

They adore each other!

He drove a car!

And aunt's scooty

Analyzed how this thing works

Explored grandma's garden

Watered the plants

Prayed in grandma's house

Spotted a monkey

Became a monkey himself

Cuddled a calf

Learnt to hit and bite... not so good times

Hence, got time-outs

And some more!

Some good moments and some not so good… a memorable year, nevertheless. Wishing you a very happy birthday my dear and hope you have a wonderful year ahead!
Ninad starts school tomorrow and I am really nervous. Wish me luck, please!
Respect
October 12, 2010 § 8 Comments
You pick up any parenting book and you will see a chapter on respecting your child as a person. I took this in without much thought and kept telling myself, “Of course, I respect my kid as a person”. I and my kid (and my family) are struggling through a bad phase right now and only now I realize what respecting your kid really means.
My son is 22 months young, which means he is in his terrible twos. He sees himself as an individual now – no longer a part of mommy. He has realized he has likes, wants, dislikes, needs and whims and fancies. He has suddenly woken up to this wonderful world around where there so many exciting new things and objects and he wants to touch every one of them and play with them. He is learning new things everyday – words, colors, shapes, names and improving his skills – grasping, climbing, jumping, kicking, rolling and what not. He looks at people around and wants to do similar things. He sees his dad touching the calendar to turn a page and he wants to do it too. He sees his mom cutting vegetables and cooking and he wants to do the same.
He is this bundle of energy, ready to take on the world and when he hears someone say ‘No’, that’s when all hell breaks loose. He sees me using the knife and cutting the potatoes. All he asks for is to let him do the same. I promptly say no and he just doesn’t understand why. He asks again and gets a negative response. He cries, I still say no. He stomps his feet, flails his arms and rolls on the ground and that’s when he is given a time-out. He stands in a corner wondering what on earth did he do to be treated like this. And I wonder why he can’t play with things that he is allowed to and why he throws tantrums like this. Why don’t I realize that he is only doing what he is expected to do. He has to explore his world, ask questions, demand things and learn new things. I complain when he is doing exactly that! After some retrospection, I no longer say no to him. It doesn’t mean I let him play with the knife. I don’t use the word ‘No’. I tell him that it’s too dangerous to play with the knife. I show him how sharp it is and how he can get cut. I offer him his toy knife and it sometimes works. If things are really bad, I give him something else in the kitchen, say a spoon. Most of the time, he refuses to take it. I tell him again, “Are you sure you don’t want the spoon? I am keeping it back”. That’s when he takes the spoon and goes on to play.
Dinner time. I am feeding him chapati. Things are going smoothly. We are almost down to the last two bites and he refuses to open his mouth. I tell him nicely to finish it up because it’s only two bites. He refuses. I lose my patience and get upset that my kid is so disobedient – he can’t finish what’s in his plate. He is upset because his mom forces him to eat one more bite even when he is full. Why can’t I respect his opinion and let him go? Why do I insist that he finish his plate? Do I really need to be so strict in disciplining him? Now that I have changed, I no longer insist anything. The moment he says enough, I stop feeding him.
The real lesson on respect came to me at the swimming pool. We have this inflatable pool which Ninad loves to play in. I fill it up with warm water, throw in his bath toys and garden toys and Ninad plays in it for hours together. The natural thing to do next was to introduce him to a real pool. I and my husband took him to the toddler pool and made him stand in it. The next moment, Ninad is out of the pool and crying like made. We both were so shocked. I tried to coax him to get in again but he flatly refused. He insisted that we get back home. We just sat by the pool side, looking at other kids and hoping that Ninad would change his mind. I was disappointed that my son was scared of the pool. All I wanted was for him to play. I kept asking him, begging him, threatening him and nothing worked. We finally came back home dejected. If I look back now, I feel I was so wrong. I should have respected his choice and brought him back home. He is not yet 2 and there is plenty of time for him to play and swim. I should have told him, ‘It’s okay son. We will come to the pool when you are ready’. Which is what I did the next time. I just let him wet his feet and hands. He splashed water here and there and he was mighty happy. And so was I. I asked him once if he wants to get into the pool and when he said no, I didn’t ask him again.
He is not as tall and not as strong as us. He is frustrated that he can’t do the same things that we do. We all sit on the dining chair so easily, while he has to make an effort and climb. We all eat and drink whenever we want. I just have to reach the cookie box on the top shelf and munch away. If Ninad wants a cookie, he needs someone to help him. We all can touch anything we want. For most of the things that he wants, he has to hear no for an answer. And he can’t understand why we say no. If we are in the middle of something, we often ignore his requests. This, for me, is a big no-no. I have made it a point to not ignore him no matter what and have told the same thing to everyone at home. Even if he is asking for something outside his limits, acknowledge his request and then give justification.
I have been following this simple thing for a few days now and I already see a change in Ninad’s behavior. There are fewer tantrums and melt-downs. All it took was a realization that ‘respecting your kid’ is easier said than done.
At the clinic…
October 4, 2010 § 1 Comment
We took Ninad to the doctor for his teething problems. Ninad has been teething badly and doesn’t sleep well at all. On the way to the doctor, I had a chat with Ninad and asked him to tell the doctor about the pain. I also told him that the doctor will ask him to open his mouth wide so that he can see his gums. Ninad knows the story where Krishna opens his mouth and his mom sees ‘Brahmanda’ (world), so I used that story and said Ninad also should open his mouth wide.
Cut to the clinic. Ninad is plonked on the table. Doctor asks him ‘How are you Ninad?’ Promptly comes the reply, “Hallu bou, galla bou, kai bou” which means ‘Teeth – pain, cheeks – pain, hand – pain”. The doctor got his torch out and said, ‘Open your mouth’. Ninad opened his mouth wide and after a second, he points to his open mouth and says ‘Brahmanda’! The doctor didn’t realize and when I told him the story, he laughed out loud. Ninad and his Brahmanda!
Weaned!
October 4, 2010 § 2 Comments
One of my biggest worries when it came to Ninad was his addiction to his bottle. He was so attached to it and dependent on it that I was afraid he was going to enter college with a bottle in his bag. He was never a sound sleeper and I suspected his disturbed sleep on his bottle. He would search for his bottle all around him even in his sleep and would wake up crying if he didn’t find it. When I had many sleepless nights in a row, I decided to take things in my hand and wean him off the bottle.
First step was to let Ninad know that the bottle was going away. I told him a story about a crow and its teeny, tiny babies which are hungry because they don’t have a bottle to drink milk with. Ninad was so concerned he voluntarily gave the bottle and asked me to give it to ‘ka-ka’. I left the bottles in the balcony and after a few minutes, the crow took the bottles away and left some chocolates for Ninad. So good so far.
Come afternoon, his nap time and the kid refused to go to sleep without a bottle. The moment I said ‘nap’, he would say ‘bottle’. Eventually, the day turned to night and he hadn’t taken a nap. No crying, atleast. So good so far.
He had a good dinner and said ‘sleep’ and added ‘bottle’ to it. I reminded him about the crow and he had this sad expression on his face which clearly meant ‘Why did I ever give the bottle away?’ I told him a story, sang him a song and he fell asleep in a few minutes. Not bad!
After two hours, Ninad woke up screaming and asked for bottle. I reminded him about the crow, but no use. He demanded that the crow get the bottle back because ‘it’s mine and I want it now’. I gave him gems and he went back to sleep. This went on for a couple of times all through the night and none of us had a good sleep. Thank God, I had decided to leave the bottles in the office, otherwise I would have weakened and given him the bottle.
After this horrible night, I wasn’t looking forward to the next day, but it was relatively uneventful. Ninad took a nap and slept well in the night. He did wake up a couple of times, but there was no screaming or flailing arms or stomping feet. From then on, it was a smooth sail. He had this sad look in his eyes for a few days and it tore my heart. I felt so sorry for him that the object of his affection went away. Thankfully, it didn’t affect him emotionally. Overnight, there was a complete change in my little kid. He started behaving all grown up, he was a big boy now, you see, because he no longer used a bottle. He drinks milk in his new, bright orange cup and he loves it.
Looking back, I am extremely lucky that things went so smooth for me and Ninad. Thank God and thank the mothers on my parenting forum. Now that he is weaned, there are certain changes in his routine.
Pros
1. Ninad sleeps really well in the night. From waking up every 2 hours to sleeping like a log all through the night, it has been a welcome change. Only mothers can understand when I say ‘He sleeps through the night’.
2. His appetite is much better. He eats a good three meals a day and snacks in between, 2-3 cups of milk a day and he is set.
3. He is all grown up now. It might be my illusion but Ninad has this grown up look now. He talks differently and behaves differently. Even my mom agrees with me on this, so it may not be an illusion after all.
4. He is slowly learning to fall asleep on his own. You see, I never tried the no-cry solution or the CIO technique to make him learn to fall asleep. I know he is going to learn that when the time comes. Till then, I don’t mind singing for him until he dozes off.
Cons
1. Since he doesn’t use a bottle anymore, it takes longer to put him to bed. A story and a song isn’t enough any more. It usually goes on for 2 stories and a couple of songs. It sometimes takes an hour and on those days, my husband finds me asleep when Ninad is happily playing next to me.
2. Making him drink from a cup during the day is a bit hard.
All said and done, weaning worked like a charm for me. I am kicking myself why I didn’t try this earlier!